Bake the perfect Classic Apple Pie with a golden flaky crust and sweet spiced apples. A timeless, all-American dessert everyone will love!
There’s something incredibly nostalgic and heartwarming about a slice of Classic Apple Pie. This all-American dessert is not just a treat—it’s a symbol of tradition, family gatherings, and cozy fall evenings. Whether it’s served at Thanksgiving, during a summer picnic, or just as a comforting homemade dessert, apple pie brings people together with its inviting aroma and timeless appeal.
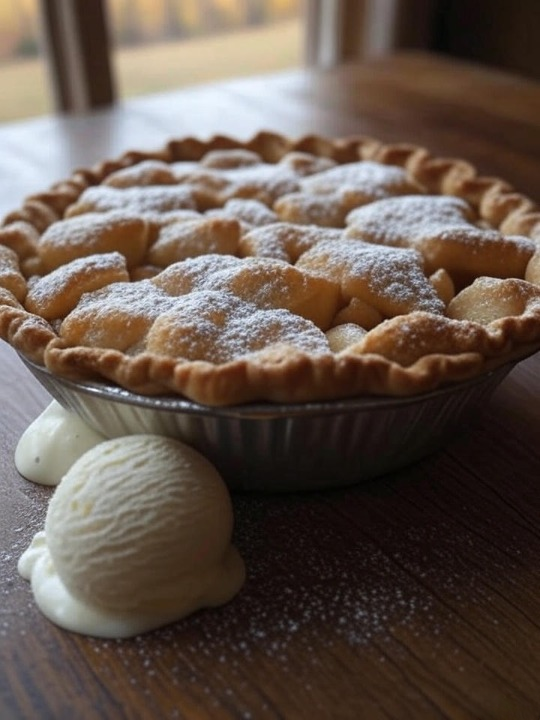
The magic of a classic apple pie lies in its simplicity. A buttery, flaky crust embraces tender apples coated in sugar, cinnamon, and nutmeg, all baked to golden perfection. The filling is juicy and sweet with just the right amount of spice, and the crust offers that crisp, melt-in-your-mouth finish we all crave.
What makes this version truly special is the careful balance of tart and sweet apples, combined with just the right touch of lemon to brighten the flavor. Whether you’re a novice baker or a seasoned pro, this recipe is easy to follow and guarantees impressive results.
Get ready to fill your kitchen with the warm, comforting scent of baking apples and cinnamon. Let’s dive into the step-by-step journey of making your own Classic Apple Pie at home.
Ingredients
For the pie crust (double crust):
- 2 ½ cups all-purpose flour
- 1 tsp salt
- 1 cup (2 sticks) unsalted butter, cold and cut into cubes
- 6–8 tbsp ice water
For the apple filling:
- 6 cups peeled and thinly sliced apples (Granny Smith & Honeycrisp recommended)
- ¾ cup granulated sugar
- ¼ cup brown sugar
- 1 ½ tsp ground cinnamon
- ¼ tsp ground nutmeg
- 1 tbsp lemon juice
- 2 tbsp all-purpose flour
For assembling:
- 1 egg (for egg wash)
- 1 tbsp milk
- Granulated sugar (for sprinkling)
Directions
- Prepare the crust: In a large bowl, whisk together flour and salt. Cut in the cold butter using a pastry cutter or fingers until mixture resembles coarse crumbs. Gradually add ice water, one tablespoon at a time, until dough begins to form. Divide into two discs, wrap in plastic wrap, and refrigerate for at least 1 hour.
- Make the filling: In another bowl, combine sliced apples, both sugars, cinnamon, nutmeg, lemon juice, and flour. Toss until apples are well coated. Let rest while rolling the dough.
- Roll out the dough: On a lightly floured surface, roll out one dough disc into a 12-inch circle. Place it into a 9-inch pie plate and press gently. Trim excess dough from edges.
- Fill the pie: Pour apple filling into the crust, spreading evenly.
- Top the pie: Roll out the second dough disc. Lay it over the apples for a full crust or cut into strips for a lattice top. Press edges to seal and crimp. Cut slits if using a full top crust.
- Egg wash: Beat the egg with milk. Brush over the top crust and sprinkle with sugar.
- Bake: Preheat oven to 425°F (220°C). Bake pie for 45–50 minutes, until the crust is golden and filling is bubbly. If edges brown too quickly, cover with foil.
- Cool: Let pie cool for at least 2 hours before slicing.
How to Prepare
Start by gathering all ingredients and tools: mixing bowls, rolling pin, pie dish, peeler, and a pastry brush. Cold butter is essential for a flaky crust, so keep it chilled until ready to use. When mixing the dough, avoid overworking—it should hold together but not be sticky.
For the filling, slice apples thinly and uniformly to ensure even cooking. Combining tart Granny Smiths with sweeter Honeycrisp apples creates a complex flavor and perfect texture.
Roll dough gently and evenly to avoid tears. Transfer the bottom crust to the dish and chill it briefly while preparing the top. If opting for a lattice design, cut strips carefully and weave them over the filling.
Apply egg wash just before baking to give the crust a golden sheen. Bake in the lower third of the oven to prevent a soggy bottom. Letting the pie cool before serving helps the filling set for clean slices.
Preparation Time
- Pie crust preparation: 20 minutes
- Chilling time for dough: 1 hour
- Filling preparation: 15 minutes
- Rolling and assembling: 20 minutes
- Baking time: 45–50 minutes
- Cooling time: 2 hours
- Total time: Approx. 4 hours
Servings
This recipe yields 8 generous slices of Classic Apple Pie.
Conclusion
There’s a reason Classic Apple Pie has stood the test of time—it’s a comforting, flavorful dessert that never goes out of style. With its flaky, golden crust and tender spiced apples, it delivers warmth and joy in every bite. It’s perfect for any celebration or simply as a special weekend treat.
Baking this pie from scratch is a truly rewarding experience. As the scent of apples and cinnamon fills your home, you’ll be reminded why homemade pies have such a special place in our hearts and kitchens. Whether topped with a scoop of vanilla ice cream or enjoyed solo, this apple pie will make memories last long after the last crumb is gone.
So roll up your sleeves, preheat that oven, and create your own slice of American tradition. This Classic Apple Pie is bound to become a family favorite for generations to come.
FAQs
Q1: Can I make the pie crust ahead of time?
Yes! You can prepare and refrigerate the pie dough for up to 3 days or freeze it for up to 3 months. Thaw overnight in the fridge before using.
Q2: What are the best apples for apple pie?
Granny Smith and Honeycrisp apples are ideal. They hold their shape and offer a balance of tart and sweet flavor.
Q3: How do I prevent a soggy bottom crust?
Bake the pie on the lower rack of the oven and use a glass or metal pie plate for better heat distribution. You can also brush the bottom crust lightly with egg white before filling.
Q4: Can I use store-bought pie crust?
Absolutely. While homemade crust offers better flavor and texture, store-bought crust works well in a pinch.
Q5: How do I store leftover apple pie?
Cover loosely with foil or plastic wrap and store at room temperature for up to 2 days, or refrigerate for up to 5 days. Warm slices in the oven before serving for best taste.