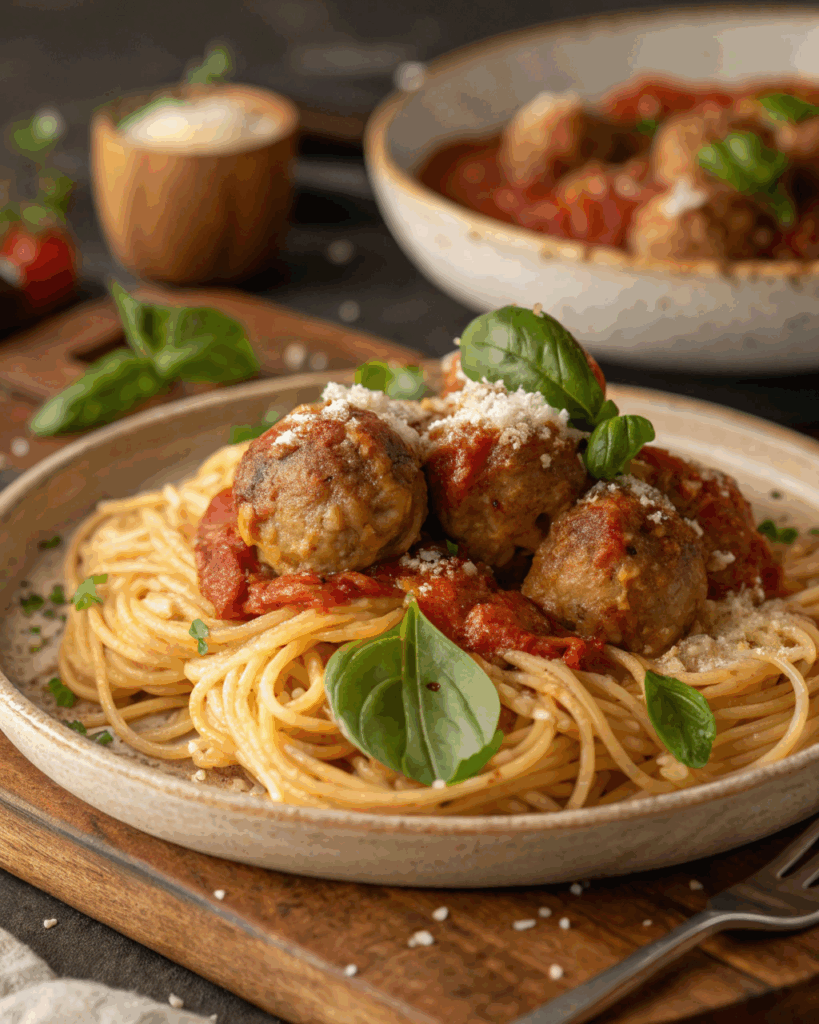
There are certain dishes that transcend mere sustenance. They are edible heirlooms, passed down through family kitchens and perfected in bustling neighbourhood trattorias. They are the meals we crave on a chilly evening, the ones we make to celebrate a small victory, or the ones that simply whisper “home.” At the very top of that hallowed list sits the undisputed king of Italian-American comfort food: Classic Chicken Parmesan.
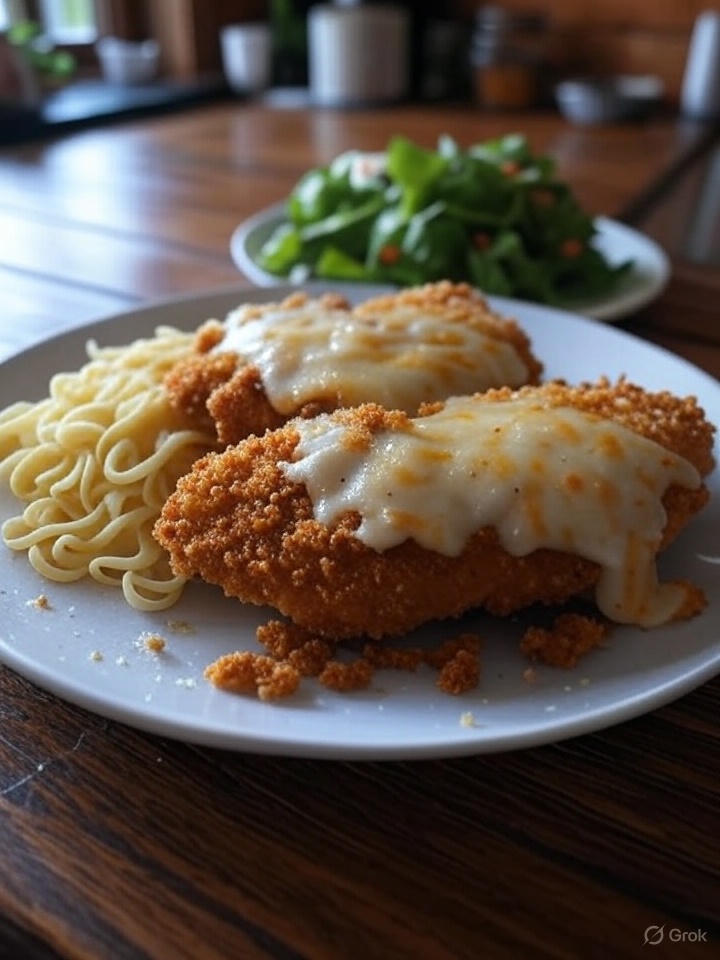
Imagine it: A perfectly golden, audibly crispy chicken cutlet, impossibly juicy and tender on the inside. It’s lavished with a rich, vibrant marinara sauce, bubbling with flavour. Blanketing it all is a glorious melt of mozzarella and sharp, nutty Parmesan cheese, toasted to a spotty, golden-brown perfection. Served alongside a tangle of spaghetti or with a side of crusty garlic bread, it’s not just a meal; it’s an experience.
For many, achieving this restaurant-quality perfection at home feels like a culinary Everest. The pitfalls are many: soggy breading, dry chicken, a watery sauce, or a disappointing cheese pull.
Fear not. This is more than just a recipe. This is your comprehensive masterclass. We are going to demystify the entire process, step-by-step, transforming you into a Chicken Parm maestro. We will delve into the science of the perfect crunch, the secrets to succulent chicken, and the art of balancing sauce and cheese. By the end of this guide, you won’t just know how to make Classic Chicken Parmesan; you’ll understand why each step is crucial for creating the crispy comfort dinner of your dreams.
So, roll up your sleeves, put on your favourite apron, and let’s create something truly spectacular.
The Anatomy of a Perfect Chicken Parmesan
Before we even touch a pan, let’s break down the core components. Understanding the role each element plays is the first step towards culinary greatness. A truly memorable Chicken Parmesan is a symphony where every instrument plays in perfect harmony.
1. The Star of the Show: The Chicken
It all starts here. The quality and preparation of the chicken are non-negotiable.
- The Cut: Boneless, skinless chicken breasts are the traditional and best choice. They provide a large, even surface area perfect for breading and frying. Look for breasts that are plump and fresh, about 6-8 ounces (170-225g) each.
- The Pound: This is arguably the most critical step for tender, juicy results. Pounding the chicken to an even thickness (about ½-inch) does two magical things:
- Tenderizes: The physical action of the mallet breaks down tough muscle fibres, resulting in a more tender cutlet.
- Ensures Even Cooking: A uniformly thick piece of chicken cooks at the same rate. You won’t have a burnt, dry edge with a raw, undercooked centre. This allows you to achieve that perfect golden-brown crust without sacrificing the chicken’s moisture.
Pro-Tip on Pounding: To avoid a mess, place the chicken breast inside a large zip-top bag or between two sheets of plastic wrap before pounding. Use the flat side of a meat mallet, a rolling pin, or even the bottom of a heavy skillet. Start in the centre and work your way out, using gentle but firm thuds. You’re persuading the chicken, not punishing it.
2. The Crispy Armour: The Breading Station
The “soggy breading” nightmare ends today. The secret is a classic three-step dredging process, with each step meticulously seasoned.
- Step 1: The Flour Coat (The Primer): This is the foundation. A light coating of all-purpose flour gives the egg wash something to cling to. Without it, the egg (and subsequently the breadcrumbs) would slide right off the slick surface of the chicken. Crucially, you must season the flour with salt, black pepper, and perhaps a little garlic powder. Seasoning every layer is a core principle of professional cooking.
- Step 2: The Egg Wash (The Glue): This is the binder that holds everything together. A couple of large eggs, beaten with a splash of water or milk, create the perfect adhesive for our breadcrumbs. The little bit of liquid thins the egg slightly, allowing for a more even and less “gummy” coating.
- Step 3: The Breadcrumb Crust (The Crunch): This is where the magic happens. For the ultimate crispy Chicken Parmesan, I advocate for a 50/50 blend:
- Panko Breadcrumbs: These Japanese-style breadcrumbs are coarser and flakier than traditional breadcrumbs. They absorb less oil, resulting in a lighter, airier, and significantly crunchier crust.
- Italian-Style Breadcrumbs: These are finer and usually come pre-seasoned with herbs like oregano and parsley. They provide a wonderful depth of flavour and help create a more complete, sealed crust.
- The Add-Ins: To elevate your breadcrumb mixture from good to sublime, mix in a generous amount of finely grated Parmesan cheese, dried parsley, and a pinch of salt. The Parmesan will toast as the chicken fries, adding an incredible nutty, savoury flavour right into the crust itself.
3. The Soul of the Dish: The Marinara Sauce
A great sauce doesn’t overpower; it complements. It should be rich and flavourful but not watery, which is a primary cause of soggy breading.
- Store-Bought vs. Homemade: Don’t feel ashamed to use a high-quality store-bought marinara! Look for brands that use simple, recognizable ingredients like San Marzano tomatoes, olive oil, garlic, and basil. A good jarred sauce is a fantastic time-saver.
- A Quick Homemade Option: If you have an extra 20 minutes, a simple homemade sauce is unparalleled. Sauté minced garlic in olive oil, add a 28-oz can of crushed San Marzano tomatoes, a teaspoon of sugar (to balance acidity), a generous pinch of dried oregano, and fresh basil. Let it simmer while you prep the chicken. That’s it!
- The “Saucing” Strategy: We’ll cover this in the method, but here’s a preview: never, ever place your crispy chicken cutlet in a pool of sauce. The sauce goes on top, and only just before it goes into the oven.
4. The Crowning Glory: The Cheese
The final touch that brings it all home. The right cheese blend is key for that perfect melt, flavour, and iconic “cheese pull.”
- Low-Moisture Mozzarella: This is paramount. Do NOT use fresh mozzarella packed in water. It will release too much liquid as it melts, creating a soupy mess on top of your chicken. Use low-moisture mozzarella, either whole milk (for creaminess) or part-skim. For the best melt possible, buy a block and grate it yourself. Pre-shredded cheeses are coated in starches like potato starch or cellulose to prevent clumping, which inhibits a smooth, glorious melt.
- Parmigiano-Reggiano: The “Parm” in Chicken Parmesan. Use the real deal. It’s sharp, salty, nutty flavour cuts through the richness of the mozzarella and sauce. A final sprinkle over the top before and after baking adds a layer of complexity that is simply essential.
- The Optional Pro-Move (Provolone): For an extra layer of flavour and an incredible melt, sneak a slice or two of deli-style provolone cheese under the mozzarella. Its mild smokiness adds a wonderful depth.
The Recipe: Classic Chicken Parmesan for Crispy Comfort Dinner Perfection
Now that you’re an expert on the theory, let’s put it into practice. Follow these steps precisely, and you’re guaranteed a spectacular result.
Prep time: 25 minutes
Cook time: 25 minutes
Servings: 4
Essential Equipment:
- Meat mallet or rolling pin
- 3 shallow dishes or pie plates (for breading)
- Large, heavy-bottomed skillet (cast iron is excellent)
- Tongs
- Wire cooling rack
- Baking sheet (9×13 inch or similar)
- Box grater
Ingredients:
For the Chicken:
- 2 large boneless, skinless chicken breasts (about 1.5 lbs / 680g total), halved horizontally to create 4 cutlets
- 1 cup all-purpose flour
- 1 teaspoon kosher salt (plus more for seasoning)
- ½ teaspoon black pepper
- ½ teaspoon garlic powder
- 2 large eggs
- 1 tablespoon water or milk
- 1 cup Panko breadcrumbs
- 1 cup Italian-style seasoned breadcrumbs
- ½ cup finely grated Parmesan cheese, plus more for serving
- 1 tablespoon dried parsley
- ½ cup neutral oil for frying (such as canola, vegetable, or avocado oil)
For the Assembly:
- 2 cups high-quality marinara sauce (store-bought or homemade)
- 8 ounces (225g) low-moisture mozzarella cheese, freshly grated
- Optional: 4 slices of provolone cheese
- Fresh basil or parsley for garnish
Step-by-Step Instructions:
Step 1: Prepare the Chicken Cutlets
- Slice and Pound: Take your two large chicken breasts and carefully slice each one in half horizontally to create four thinner cutlets. Place one cutlet at a time inside a large zip-top bag or between two sheets of plastic wrap.
- Even Thickness: Using the flat side of a meat mallet, gently but firmly pound the chicken until it is an even ½-inch thickness all over. This is key for a tender result.
- Season: Remove the chicken from the plastic and season both sides generously with salt and pepper. Set aside.
Step 2: Set Up the Breading Station
- Prepare Dishes: Arrange three shallow dishes side-by-side.
- Dish 1 (Flour): In the first dish, whisk together the flour, 1 teaspoon of kosher salt, black pepper, and garlic powder until combined.
- Dish 2 (Egg): In the second dish, whisk the two eggs with the tablespoon of water until smooth and uniform.
- Dish 3 (Breadcrumbs): In the third dish, combine the panko breadcrumbs, Italian breadcrumbs, ½ cup of grated Parmesan cheese, and dried parsley. Use a fork to mix thoroughly.
Step 3: Bread the Chicken
- Work One by One: Take one seasoned chicken cutlet and dredge it in the flour mixture, shaking off any excess. Ensure it’s fully coated. This is your primer.
- Dip in Egg: Transfer the floured cutlet to the egg wash. Let any excess egg drip off. The coating should be thin and even.
- Coat in Breadcrumbs: Immediately place the egg-coated cutlet into the breadcrumb mixture. Press down gently to ensure the crumbs adhere all over. Flip and repeat. Place the breaded cutlet on a clean plate or wire rack. Repeat with the remaining three cutlets.
Step 4: Fry for the Perfect Crunch
- Heat the Oil: Place your large skillet over medium-high heat. Add the oil—it should be about ¼-inch deep. Let it heat up until it shimmers. To test if it’s ready, drop a breadcrumb in; if it sizzles vigorously, you’re good to go.
- Fry in Batches: Carefully place two chicken cutlets in the hot oil. Do not overcrowd the pan, as this will lower the oil temperature and lead to greasy, soggy chicken.
- Golden Brown: Fry for 2-4 minutes per side, until deep golden brown and crispy. The chicken doesn’t need to be cooked through at this stage; we will finish it in the oven.
- Drain Properly: Using tongs, transfer the fried chicken to a wire cooling rack set over a baking sheet. This allows air to circulate, keeping the bottom crust just as crispy as the top. Repeat the frying process with the remaining two cutlets.
Step 5: Assemble and Bake
- Preheat Oven: Preheat your oven to 400°F (200°C).
- Prepare Baking Dish: You can assemble directly on the wire rack over the baking sheet (for maximum crispiness) or transfer the cutlets to a 9×13 inch baking dish.
- Sauce and Cheese: Spoon about ¼ cup of marinara sauce onto the top centre of each crispy cutlet, spreading it slightly but leaving a border of crispy breading exposed around the edges.
- Layer the Cheese: If using, place one slice of provolone on top of the sauce. Then, pile a generous amount of the grated low-moisture mozzarella over the sauce on each cutlet. Finally, sprinkle a little extra Parmesan cheese over the mozzarella.
- Bake to Perfection: Place the baking sheet in the preheated oven. Bake for 10-15 minutes, or until the cheese is completely melted, bubbly, and starting to get golden brown spots. The internal temperature of the chicken should reach 165°F (74°C).
- Rest and Garnish: Remove from the oven and let it rest for a few minutes. This allows the juices in the chicken to redistribute. Garnish with fresh chopped basil or parsley before serving.
Pro-Tips for Never-Soggy, Always-Crispy Chicken Parmesan
Mastered the basics? Here are the insider secrets that separate the good from the legendary.
- Don’t Skip the Wire Rack: I cannot stress this enough. Both after frying and during baking, the wire rack is your best friend. It elevates the chicken, allowing hot air to circulate all around it, preventing the bottom from steaming and turning into a mushy mess.
- Oil Temperature is Key: If your oil is too cool, the breading will absorb it like a sponge. If it’s too hot (smoking), the breading will burn before the chicken cooks. Shimmering oil is the visual cue you’re looking for.
- The “Dry Hand, Wet Hand” Technique: When breading, use one hand exclusively for the dry ingredients (flour, breadcrumbs) and the other hand for the wet ingredient (egg). This prevents your fingers from becoming caked in a gummy paste and ensures a cleaner, more even coating on the chicken.
- Strategic Sauc-ing: Be judicious with the sauce before baking. You want enough to provide flavour and moisture, but not so much that it pools and drowns your hard-earned crispy crust. You can always serve extra warm marinara on the side for dipping.
- Broil for a Final-Touch: If your cheese is melted but you want more of those beautiful browned spots, switch your oven to the broil setting for the last 30-60 seconds. Watch it like a hawk—it can go from perfect to burnt in a heartbeat!
Serving Suggestions: The Perfect Partners
A magnificent Chicken Parmesan deserves the perfect accompaniments.
- The Classic Pairing: A generous portion of spaghetti or linguine tossed in a little olive oil or extra marinara sauce is the quintessential choice.
- The Lighter Side: For a lower-carb option, serve it over a bed of zucchini noodles (“zoodles”) or with a simple, crisp arugula salad dressed with lemon vinaigrette.
- Essential Vegetables: Roasted broccoli or broccolini with garlic and a squeeze of lemon, or simple sautéed spinach with garlic, both cut through the richness beautifully.
- Don’t Forget the Bread: You’ll want something to mop up every last bit of sauce. A crusty loaf of Italian bread or homemade garlic bread is a must.
- Wine Pairings: An Italian-American classic calls for an Italian wine. A medium-bodied Chianti Classico is the perfect match, its bright acidity and cherry notes cutting through the fat and complementing the tomato sauce. A bright Sauvignon Blanc is a great white wine option.
Storage, Reheating, and Make-Ahead Magic
Life is busy. Here’s how to make Classic Chicken Parmesan work for your schedule.
- Storing Leftovers: Store leftover cutlets in an airtight container in the refrigerator for up to 3 days. Store them separately from any leftover pasta.
- The BEST Way to Reheat: The microwave is the enemy of crispiness! To revive your Chicken Parmesan, place it on a wire rack on a baking sheet and heat it in a 350°F (175°C) oven or toaster oven for 10-15 minutes, or until warmed through and the crust has re-crisped. An air fryer also works wonderfully for this.
- Make-Ahead Prep: You can do most of the work in advance. Bread the chicken cutlets as directed, lay them in a single layer on a baking sheet, cover with plastic wrap, and refrigerate for up to 24 hours. When you’re ready to cook, just proceed with the frying step.
- Freezing Instructions: Chicken Parmesan freezes beautifully. For best results, fry the cutlets and let them cool completely. Flash-freeze them in a single layer on a baking sheet. Once solid, transfer them to a freezer-safe bag or container, placing parchment paper between layers. They will keep for up to 3 months. To cook from frozen, bake at 400°F (200°C), top with sauce and cheese as directed, and add about 15-20 minutes to the baking time.
Frequently Asked Questions (FAQ)
Q: Can I bake the chicken instead of frying it to make it healthier?
A: Absolutely. While you won’t get the same deep, crunchy crust, a baked version is still delicious. To do it, preheat your oven to 425°F (220°C). Place the breaded cutlets on a wire rack set on a baking sheet. Spray the tops generously with cooking spray. Bake for 15 minutes, flip, spray the other side, and bake for another 10 minutes. Then, top with sauce and cheese and bake until melted as directed.
Q: Why is my Chicken Parmesan soggy?
A: The most common culprits are: 1) Not using a wire rack to drain the chicken, 2) Overcrowding the pan during frying, 3) Using watery fresh mozzarella, or 4) Drowning the chicken in too much sauce before baking. Follow the tips in this guide, and soggy chicken parm will be a thing of the past.
Q: What’s the difference between Chicken Parmesan and Chicken Parmigiana?
A: Nothing! They are two names for the same iconic dish. “Parmigiana” is the more formal Italian term, while “Parmesan” or “Parm” is the common American-English vernacular.
Q: Can I use chicken thighs?
A: Yes, you can use boneless, skinless chicken thighs. They are naturally more forgiving and less prone to drying out. You will still want to pound them to an even thickness. The flavour will be slightly richer.
Conclusion: More Than a Meal, It’s a Memory
Making a Classic Chicken Parmesan from scratch is a labour of love, but the payoff is immeasurable. The sound of the sizzle in the pan, the aroma of garlic and tomatoes filling your home, and the sight of that perfectly melted cheese are all part of the joy.
This is the kind of cooking that builds confidence and creates lasting memories around the dinner table. It’s a dish that says, “I took the time to make something special for you.” With this guide, you now have all the tools and knowledge to nail it every single time. So go forth, cook with confidence, and enjoy every crispy, cheesy, comforting bite.
Did you make this recipe? We’d love to hear from you! Leave a comment and a star rating below, and don’t forget to tag us on social media with a picture of your masterpiece