
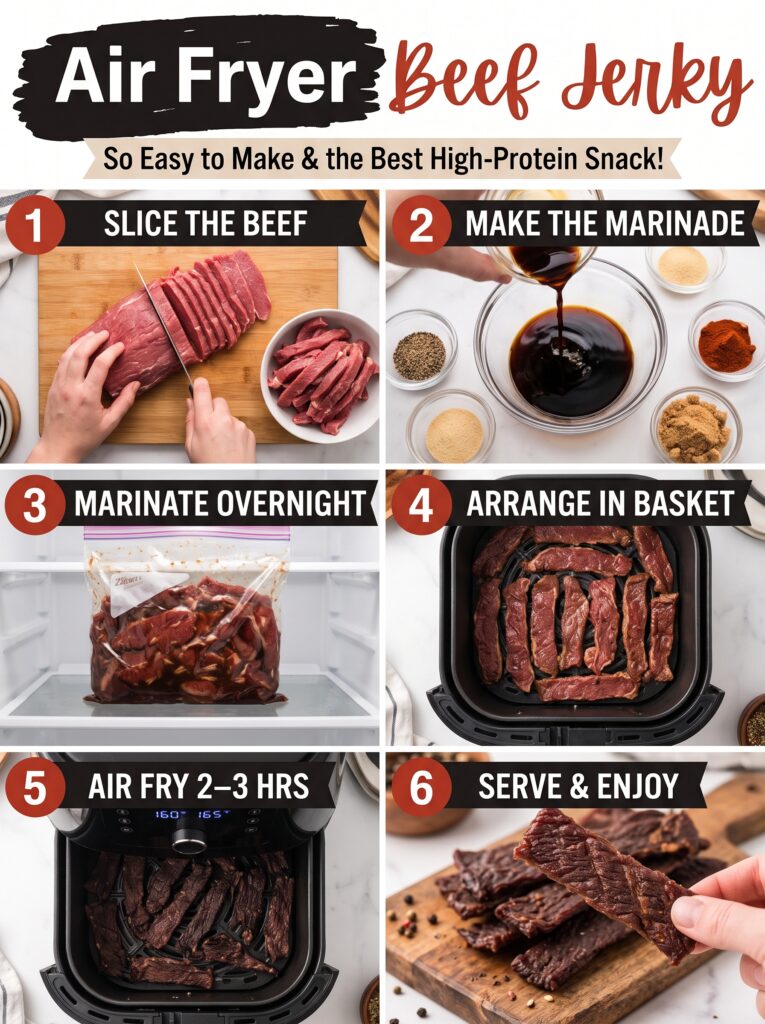

By Sarah Johnson
I still remember the first time I tried making jerky at home. It was a disaster. I had this romantic vision of recreating the smoky, chewy strips I used to buy at the farmer’s market, but instead, I ended up with what can only be described as beef-flavored shoe leather. My oven ran too hot, the marinade was unbalanced, and I spent the better part of an afternoon scrubbing a baking sheet that looked like it had survived a house fire.
That was years ago. Since then, I’ve learned a trick or two—mostly through trial, plenty of error, and a stubborn refusal to give up on the idea that homemade jerky could actually be better than the store-bought stuff. And here’s the thing I discovered: the air fryer changes everything.
If you’re raising an eyebrow right now, I get it. An air fryer for jerky? Isn’t that the appliance you use for crispy chicken wings and frozen fries? Well, yes. But it’s also a surprisingly brilliant low-temperature dehydrator if you know how to use it. We’re talking about a fraction of the time it takes in a traditional oven or smoker—two to three hours instead of eight . The circulating air does the heavy lifting, drying the meat evenly without turning your kitchen into a sauna.
Jerky itself has a history that stretches back much further than most of us realize. The word comes from charqui, a term used by the Quechua people of South America, who were drying meat to preserve it for long journeys as early as the 1500s . It was practical food—protein that wouldn’t spoil when refrigeration didn’t exist. Over centuries, cultures from the Roman coppiette to Chinese dengying niurou (shadow play beef, named for its paper-thin translucence) have put their own spin on dried meat . What we’re making today is a modern, weeknight-friendly version of that ancient idea.
So, why the air fryer? Because it’s accessible. You don’t need a dedicated dehydrator, a smoker, or a fancy setup. You need a lean cut of beef, a marinade that balances salt, sweet, and savory, and a little patience while the machine does its thing. The result is a batch of jerky that’s tender enough to bite through without a struggle, packed with flavor, and genuinely high in protein—perfect for lunchboxes, hiking trails, or that 3 p.m. slump when you need something more substantial than a handful of crackers.
Let’s get into it.
Ingredients
Here’s where things get real. The beauty of this recipe is that it’s flexible—once you understand the ratios, you can tweak the flavors to your heart’s content. But start here first.
For the Beef
- 1 kg (2.2 lbs) lean beef — topside, eye of round, or inside round. Look for a roast or thick steak with minimal visible fat.
For the Marinade
- 125 ml (½ cup) soy sauce — regular or dark, but not sweetened teriyaki-style
- 60 ml (¼ cup) Worcestershire sauce
- 2 tablespoons brown sugar — packed
- 2 teaspoons fine salt
- 1 teaspoon freshly ground black pepper
- 1 teaspoon garlic powder
- 1 teaspoon onion powder
- 1 teaspoon smoked paprika — this is where that subtle smoky depth comes from
- ½ teaspoon bicarbonate of soda — optional, but a game-changer for texture
Substitution Notes (Because Life Happens)
No Worcestershire? Use coconut aminos or a splash of balsamic vinegar plus a pinch of sugar. It won’t be identical, but it’ll get you close.
Watching sodium? Swap the soy sauce for a low-sodium version and cut the added salt to 1 teaspoon. The jerky will still have that savory backbone, just a little gentler.
Gluten-free? Tamari is your friend here. It delivers the same umami punch without the wheat . Just double-check your Worcestershire—some brands sneak barley malt in there.
Sugar-free or keto? Replace the brown sugar with a tablespoon of granulated monk fruit sweetener. The caramelization won’t be quite the same, but the flavor balance holds up.
The Ingredient Spotlight: Why Bicarbonate of Soda?
I know it sounds odd. A pinch of baking soda in a meat marinade? But this is a technique called “velveting,” and it’s common in Chinese cooking for a reason. The alkaline nature of the bicarb raises the pH on the surface of the meat, which prevents the muscle fibers from tightening up too much as they dry. The result is jerky that stays slightly pliable and tender rather than snapping like a twig . It also has a mild preservative effect, helping your batch last a touch longer in the fridge.
A Note on the Cut
You want lean. This isn’t the time for a beautifully marbled ribeye. Fat doesn’t dehydrate—it just goes rancid faster and leaves you with greasy, short-lived jerky . Topside (also called top round in some places) is the butcher’s recommendation for a reason: it’s affordable, readily available, and has a muscle structure that slices into clean, even strips . Eye of round is another excellent choice, slightly more flavorful in my experience .
What to Serve With
Jerky is wonderful on its own—that’s kind of the point. But if you’re putting together a spread, here are some pairings that make sense.
1. Sharp Cheddar and Crackers
The saltiness and chew of the jerky against the creamy sharpness of a good cheddar is a classic for a reason. Add a few water crackers and you’ve got an instant snack board.
2. Pickled Vegetables
Quick-pickled carrots, daikon, or jalapeños cut through the richness of the meat. The acidity resets your palate between bites, which means you’ll enjoy every strip a little more.
3. A Simple Slaw
Something crunchy and vinegar-forward—think cabbage, apple, and a mustard vinaigrette. It’s light, crisp, and balances the intensity of the jerky.
4. Cold Beer (or a Dry Cider)
A crisp pilsner or a dry apple cider is the move here. The carbonation and slight bitterness cleanse the palate, and the alcohol doesn’t overpower the seasoning. If you’re not drinking, a strong iced tea with lemon works beautifully.
5. Cheese and Charcuterie Board
Tuck the jerky alongside some olives, nuts, dried fruit, and a soft cheese like brie. It holds its own against bold flavors without getting lost.
6. On a Hiking Trail (Yes, Really)
This isn’t a “side” in the traditional sense, but it’s the best context for jerky. Pair it with an apple, a handful of almonds, and a water bottle. That’s a lunch that won’t weigh you down.
7. Over a Simple Salad
Crumble a few strips over mixed greens with cherry tomatoes, cucumber, and a lemon vinaigrette. The jerky becomes a savory, protein-packed topping instead of a snack.
Step-by-Step Cooking Process
Step 1: Prep the Beef (and the Freezer Trick)
Image Prompt: Raw ingredients on rustic wooden table, natural daylight — a whole topside roast, bottles of soy sauce and Worcestershire, small bowls of brown sugar and spices, a sharp chef’s knife, and a cutting board.
Pat your beef dry with paper towels. If there’s any silverskin or a cap of fat on the outside, trim it off—your knife should glide through clean muscle.
Now, here’s the part people skip and then regret: partially freeze the meat. Wrap the beef loosely and pop it in the freezer for 30 to 45 minutes . You’re not trying to freeze it solid, just firm it up. Cold meat is stiff meat, and stiff meat is far easier to slice thinly and evenly. A wobbly room-temperature roast is a recipe for uneven strips, and uneven strips mean some pieces turn to dust while others stay moist.
Step 2: Slice Against the Grain
Image Prompt: Close-up shot of a sharp knife slicing a firm piece of beef into thin strips on a wooden board, with the grain lines visible.
Look at the meat. You’ll see lines running through it—those are the muscle fibers. You want to cut perpendicular to those lines, not parallel to them . This shortens the fibers, which is the difference between jerky that’s tender and jerky that requires a jaw workout.
Aim for strips about 5mm (¼ inch) thick . If you have a meat slicer, great. If not, a sharp chef’s knife and a steady hand will do the job. Don’t stress about perfection—slightly irregular pieces are part of the charm of homemade.
Step 3: Mix the Marinade
Image Prompt: Mixing ingredients in a bowl, close-up shot — dark soy sauce, Worcestershire, brown sugar, and spices being whisked together, with a small bowl of bicarbonate of soda nearby.
In a large bowl, whisk together the soy sauce, Worcestershire, brown sugar, salt, pepper, garlic powder, onion powder, smoked paprika, and bicarbonate of soda. Taste it. It should be intensely savory with a sweet edge and a whisper of smoke. If it tastes flat, add a pinch more salt. If it’s too salty, a little more sugar.
Add the beef strips to the bowl and toss thoroughly. Every piece needs to be coated. Get your hands in there if that’s easier—just make sure your rings are off.
Cover the bowl and refrigerate for at least 8 hours, or overnight . This isn’t a step you can rush. The salt needs time to penetrate the meat, and the flavors need time to meld. Four hours will do in a pinch, but overnight is where the magic happens.
Step 4: Dry and Arrange
Image Prompt: Food placed inside air fryer, modern kitchen background — beef strips laid flat in a single layer in the air fryer basket, not overlapping, with the air fryer set to a low temperature.
When you’re ready to cook, pull the beef from the fridge. Drain the marinade and discard it. Lay the strips out on a tray lined with paper towels and pat them dry . This step matters more than you’d think—surface moisture steams instead of dries, and you want drying, not steaming.
Arrange the strips in your air fryer basket in a single layer. They shouldn’t overlap . Depending on the size of your air fryer, you’ll likely need to work in two or three batches. Yes, it’s a bit tedious. Yes, it’s worth it. Overlapping pieces will fuse together and dry unevenly, and nobody wants jerky that’s leathery on one end and raw in the middle.
Step 5: Air Fry Low and Slow
Image Prompt: Cooked dish plated beautifully, vibrant colors — finished beef jerky strips piled on a slate board or wooden platter, with a few scattered spices and a small bowl of dipping sauce.
Set your air fryer to 70°C (158°F) . This is the critical part: most air fryer recipes run hot, but jerky needs gentle, low heat. If your air fryer’s lowest setting is higher, use it and check the jerky more frequently—every machine is different.
Cook for 2 to 3 hours, checking every 30 minutes after the first hour . The exact time depends on the thickness of your slices and the quirks of your specific appliance.
How do you know when it’s done? Pick up a strip and bend it. It should crack slightly at the bend but not snap cleanly in half. It should feel dry to the touch but still have a bit of give. If it’s still soft and moist, keep going. If it’s brittle, you’ve gone a little too far—it’ll still taste good, just chewier.
Step 6: Cool and Store
Let the jerky cool completely on a wire rack before storing. Residual heat will continue to dry it slightly, so don’t seal it while it’s warm.
Store in an airtight container in the refrigerator . Because homemade jerky doesn’t dry as aggressively as commercial versions, the fridge is the safest bet. It’ll keep for 3 to 4 weeks . In my house, it never lasts more than a week.
Pro Techniques (and Mistakes to Avoid)
Don’t skip the freeze. I said it once, but it bears repeating. Slightly firm meat slices cleanly. Soft meat squishes under the knife and gives you ragged, uneven strips.
Slice against the grain. Always. This is the single biggest factor in whether your jerky is tender or tough. If you’re unsure which way the grain runs, look for the lines—they’re usually pretty obvious on a topside roast .
Keep the temperature low. Your air fryer wants to blast things at 200°C. Resist. Low and slow is the only way to dehydrate meat without cooking it into submission.
Don’t crowd the basket. I know it’s tempting to pile everything in to save time. Don’t. Air needs to circulate around each piece. Crowding equals uneven drying, and uneven drying equals disappointment.
Taste the marinade before you commit. The marinade should taste a little too salty and a little too intense on its own. That’s correct—it needs to be stronger than you’d want to eat directly because it’s seasoning a large amount of meat.
Check your first batch early. Every air fryer runs differently. The first time you make this, start checking at the 90-minute mark. Once you know how your machine behaves, you can relax.
A Quick Word on Dietary Angles
This recipe as written is gluten-free if you use tamari instead of soy sauce and verify your Worcestershire sauce. It’s also dairy-free and nut-free by default.
For a halal version, ensure your beef is certified halal and skip the Worcestershire if it contains alcohol (some brands do; check the label). The soy sauce and spices carry enough flavor on their own.
For a vegan twist, this marinade works beautifully on thick-cut mushrooms or sliced tofu that’s been pressed and baked first. It won’t be jerky in the traditional sense, but it scratches the same itch.
Frequently Asked Questions
Can I use a different cut of beef?
Yes. Flank steak and skirt steak work well, though they’re thinner and will cook faster—start checking at 1½ hours . Rump works in a pinch. Just avoid anything heavily marbled.
My air fryer doesn’t go down to 70°C. What do I do?
Set it to the lowest temperature it allows (often around 80–90°C) and check the jerky every 30 minutes. It’ll likely be done closer to the 1½-hour mark.
How thin should I slice the beef?
Aim for 5mm (¼ inch) . Thicker slices take longer and can dry unevenly. Thinner slices are more forgiving but can overcook quickly.
Is homemade jerky safe?
Yes, provided you handle the meat properly. Keep it refrigerated during marinating, dry it thoroughly in the air fryer, and store the finished jerky in the fridge. The salt and low moisture environment makes it inhospitable to most bacteria .
Can I double the recipe?
Absolutely. Just cook in batches. Don’t overcrowd the basket—that’s the only rule.
Wrapping It Up
There’s something deeply satisfying about making jerky at home. It’s not just the flavor—though that’s certainly part of it. It’s the knowing. You know exactly what went into it. You know there are no mysterious preservatives or excessive sodium or ingredients you can’t pronounce. And you know that the batch sitting in your fridge is there because you made it happen, with a little help from a countertop appliance that usually just makes fries.
The first time you pull a strip from the air fryer, bend it, and feel that perfect resistance—dry but not brittle, chewy but not exhausting—you’ll get it. It’s a small victory, but a satisfying one.
Give this recipe a try. Tweak the spices. Add chili flakes if you like heat. Swap in smoked salt for a different kind of depth. The framework is solid; the rest is yours.
And if your first batch disappears before it’s fully cooled, well. That’s a sign you did something right.