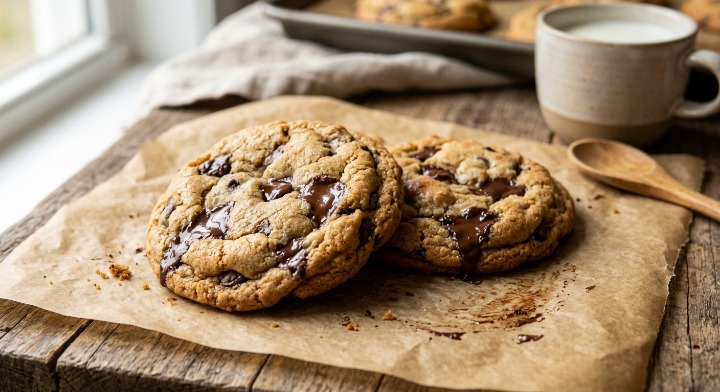
Few desserts bring comfort quite like Classic Chocolate Chip Cookies – Warm & Chewy. The aroma of buttery dough and melting chocolate drifting through the kitchen instantly feels nostalgic. For many home cooks, these cookies are more than a sweet treat—they are a tradition shared at family gatherings, school bake sales, and cozy evenings at home. 🍪
Chocolate chip cookies first gained popularity in the United States in the 1930s. They were originally created by accident when a baker added chopped chocolate to cookie dough expecting it to melt completely. Instead, the chocolate softened but kept its shape, creating the now-iconic cookie loved around the world.
I first learned to bake this recipe during a rainy afternoon in my grandmother’s kitchen. She always believed that cookies should be golden at the edges and soft in the center, never dry or crumbly. Over the years, I’ve refined her recipe with a few small adjustments that make a big difference in texture and flavor.
The ingredient spotlight here is high-quality chocolate chips. Semi-sweet chips create the classic flavor balance—rich but not overly sugary. Look for chocolate with a cocoa percentage around 50–60%. If you want a twist, chopped dark chocolate bars add pockets of melted chocolate throughout the cookie. A smart substitution is using dairy-free chocolate chips for a vegan-friendly version.
Two pro baking techniques help guarantee perfect cookies every time. First, chill the dough before baking; this prevents spreading and intensifies flavor. Second, slightly underbake the cookies so the centers remain tender as they cool. These simple tips transform an ordinary cookie into a bakery-quality treat.
Whether you’re baking for family, friends, or simply yourself, this healthy recipe–inspired homemade cookie focuses on balanced sweetness, real ingredients, and classic comfort.
Ingredients
Below are the ingredients needed to make Classic Chocolate Chip Cookies – Warm & Chewy. Measurements include both US and metric for accuracy.
- 2 ¼ cups (280 g) all-purpose flour (or use gluten-free baking blend)
- 1 tsp (5 g) baking soda
- ½ tsp (3 g) fine sea salt
- ¾ cup (170 g) unsalted butter, softened
- ¾ cup (150 g) brown sugar, packed (adds moisture and chewiness)
- ½ cup (100 g) granulated sugar
- 2 large eggs, room temperature
- 2 tsp (10 ml) vanilla extract
- 2 cups (340 g) semi-sweet chocolate chips
(or chopped dark chocolate for richer flavor) - ½ cup (60 g) chopped walnuts or pecans (optional for texture)
- 1 tbsp (15 ml) milk or almond milk (helps soften dough if needed)
Optional substitutions for a healthy recipe variation:
- Replace half the butter with Greek yogurt for a lighter texture.
- Use coconut sugar instead of white sugar.
- Choose whole wheat pastry flour for added fiber.
Directions
Creating cookies with the perfect balance of crispy edges and chewy centers depends on careful mixing, proper dough rest, and controlled baking temperature. The process begins with blending the butter and sugars until the mixture becomes light and creamy. This step incorporates air into the dough, helping cookies bake evenly.
Next, eggs and vanilla are added to provide structure and flavor depth. Dry ingredients—flour, baking soda, and salt—are gently folded into the dough. Overmixing should be avoided because it can develop too much gluten, leading to dense cookies instead of soft ones.
Chocolate chips are stirred in last so they remain evenly distributed. Some bakers like to reserve a handful of chocolate chips to press into the tops of cookies before baking, giving them a bakery-style appearance.
A brief resting period for the dough—ideally 30 minutes to several hours in the refrigerator—allows flour to hydrate and flavors to develop. Chilled dough also helps cookies maintain a thicker, chewy center during baking.
When baked at moderate heat, the cookies gradually turn golden at the edges while remaining soft inside. Removing them from the oven when the centers still look slightly underdone ensures they stay tender as they cool.
Allowing cookies to rest on the baking sheet for a few minutes after baking helps them finish setting without drying out.
How to Prepare
Preparation begins long before the cookies go into the oven. Proper ingredient handling plays a significant role in the final texture and taste.
Start by measuring ingredients accurately. Flour should be spooned into measuring cups and leveled rather than scooped directly from the bag. This prevents adding excess flour, which could make cookies dry.
Butter temperature also matters. It should be soft enough to press with a finger but not melted. Soft butter blends easily with sugar, forming a smooth base that traps air and improves cookie structure.
Another helpful preparation step is lining baking trays with parchment paper. This prevents sticking and promotes even browning on the cookie bottoms.
Many experienced bakers also prefer chilling the dough. This simple technique improves flavor complexity and reduces spreading during baking. Chilled dough also produces thicker cookies with a chewy interior—exactly what defines Classic Chocolate Chip Cookies – Warm & Chewy.
Before baking, portion the dough evenly using a cookie scoop. Uniform portions ensure cookies bake at the same rate and create a consistent presentation.
Finally, spacing cookies properly on the tray allows air to circulate, preventing them from merging together while baking.
Preparation Time
Understanding preparation time helps home cooks plan baking sessions efficiently.
Ingredient preparation:
About 10 minutes are needed to measure ingredients and soften butter.
Mixing the dough:
Creaming butter and sugar, then incorporating other ingredients, usually takes another 10 minutes.
Dough resting (recommended):
30 minutes to 2 hours in the refrigerator. This step improves flavor and texture but can be skipped if you’re short on time.
Baking time:
Each batch typically bakes in about 10–12 minutes depending on oven temperature and cookie size.
Cooling time:
Allow cookies to cool for about 10 minutes so they finish setting.
Overall, the total process usually takes about 1 hour, including resting and cooling.
Servings
This recipe yields approximately:
24 medium cookies
Serving suggestions:
- 2 cookies per person for dessert
- 1 cookie for a snack with coffee or tea
- 3 cookies for generous dessert portions
These cookies also freeze well. Baked cookies can be stored in an airtight container for several days or frozen for up to three months.
What to Serve With
Chocolate chip cookies pair beautifully with many simple accompaniments. Here are a few ideas:
- Cold milk – The classic pairing that balances sweetness and richness 🥛
- Vanilla ice cream – Creates a warm-cookie ice cream sandwich
- Fresh berries – Adds brightness and natural acidity
- Hot coffee or espresso – Perfect contrast to the sweet chocolate flavor ☕
- Homemade caramel sauce – Drizzle lightly for a decadent dessert
- Greek yogurt with honey – Adds a creamy and slightly tangy balance
- Hot chocolate or chai latte – Ideal for cozy evenings
These pairings elevate a simple cookie into a memorable dessert experience.
FAQs
1. Why are my chocolate chip cookies flat?
Flat cookies usually happen when butter is too warm or the dough lacks enough flour. Chilling the dough before baking helps cookies keep their shape.
2. How do I keep cookies soft?
Store them in an airtight container with a slice of bread. The bread helps maintain moisture so cookies remain chewy.
3. Can I make this a healthier recipe?
Yes. Substitute part of the butter with Greek yogurt, use whole wheat pastry flour, and reduce sugar slightly for a lighter version.
4. Can cookie dough be frozen?
Absolutely. Portion the dough into balls and freeze them. Bake directly from frozen by adding a couple of extra minutes to the baking time.
5. What chocolate works best?
Semi-sweet chocolate chips are classic, but dark chocolate chunks create richer flavor and melty pockets throughout the cookie.
6. Why should dough rest before baking?
Resting allows flour to hydrate and sugar to dissolve slightly. This improves flavor and produces a chewier cookie texture.
Conclusion
There is something timeless about Classic Chocolate Chip Cookies – Warm & Chewy. They represent comfort, nostalgia, and the simple joy of baking at home. With just a few pantry ingredients, home cooks can create a dessert that feels both familiar and special.
The secret to truly great cookies lies not only in ingredients but also in technique. Using quality chocolate, properly creaming butter and sugar, and allowing dough to rest are small steps that make a big difference. These techniques ensure cookies come out golden at the edges with soft, gooey centers every time.
Another wonderful aspect of this recipe is its versatility. You can customize it with nuts, different chocolates, or even healthier ingredient swaps. Whether you’re baking for a family gathering, preparing treats for friends, or simply enjoying a quiet evening snack, these cookies always feel like the right choice.
For home cooks seeking a reliable and comforting dessert, this recipe delivers consistently delicious results. The smell of cookies baking, the sight of melted chocolate, and the first warm bite straight from the tray create moments worth sharing.
Bake a batch, pour a glass of milk, and enjoy the simple pleasure of homemade cookies. 🍪✨