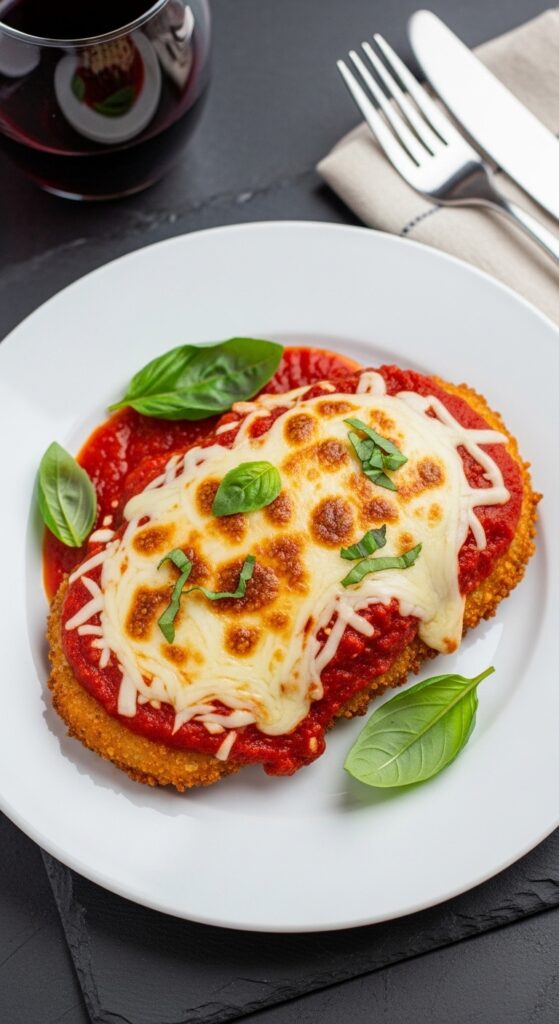

Let’s be honest for a second. We all have that one dish we order at Italian restaurants, the one that makes us feel like we’re being hugged from the inside out. For me, and I’m willing to bet for you too, it’s Chicken Parmesan. It’s the holy trinity of comfort food: breaded chicken cutlets, tangy marinara sauce, and a blanket of melted mozzarella and parmesan cheese. It’s glorious. It’s heavy. And traditionally, it’s a bit of a logistical nightmare to make at home on a Tuesday night.
You’ve got the frying station setup, the oil splatter everywhere, the oven preheating for twenty minutes just to melt the cheese, and by the time you sit down, you’re too tired to enjoy it. That used to be my reality. I loved the taste, but I hated the cleanup. Then, I bought an air fryer. Skeptical? Absolutely. I thought it was just a tiny convection oven with a lot of hype. But then I tried making Chicken Parm in it, and honestly? It changed the game.
This air fryer chicken parmesan recipe isn’t just a “healthy alternative” where you sacrifice flavor for speed. It’s arguably better than the deep-fried version because the breading stays shatteringly crisp while the chicken stays incredibly juicy, without sitting in a pool of grease. The cheese bubbles up perfectly, and the whole thing comes together in about half the time.
I’m going to walk you through exactly how to get that restaurant-quality crunch without the mess. We’ll talk about the breadcrumbs (yes, there’s a trick), the cheese blend (don’t skip the provolone), and how to avoid the dreaded “soggy bottom.” Whether you’re a meal-prep pro or a chaotic weeknight cook, this guide is for you. Let’s get cooking.
Introduction: Why This Dish Deserves a Spot in Your Weekly Rotation
Chicken Parmesan, or Pollo alla Parmigiana, has a bit of a murky origin story. While it’s synonymous with Italian-American cuisine, its roots trace back to Southern Italy’s Melanzane alla Parmigiana (eggplant parmesan). When Italian immigrants arrived in the United States, beef and chicken were more readily available and affordable than eggplant in some regions, leading to the meat-based variation we know and love today. It became a staple of red-sauce joints across the Northeast, evolving into the breaded, fried, sauced, and baked masterpiece that dominates menus from New York to New Jersey.
But here’s the thing about traditional Chicken Parm: it’s labor-intensive. You have to pound the chicken, set up a dredging station, heat inches of oil, fry in batches, drain on paper towels, top with sauce and cheese, and then bake. It’s a two-cooking-method marathon.
The air fryer simplifies this into a streamlined, one-appliance wonder. By circulating hot air at high speeds, the air fryer mimics the crisping effect of deep frying but uses a fraction of the oil. The result is a lighter dish that doesn’t feel heavy in your stomach afterward, yet still delivers that essential crunch.
A Kitchen Confession
I remember the first time I tried this. I was hosting a small dinner party—nothing fancy, just four friends who appreciate good food but don’t expect Michelin stars. I was running late. Like, really late. I had planned to make the traditional fried version, but my oil wasn’t heating up fast enough, and I was panicking. In a moment of desperation, I threw the breaded cutlets into the air fryer basket, crossed my fingers, and set the timer.
Ten minutes later, I pulled them out. They were golden. Not pale, not burnt, but this perfect, even amber color. I topped them with sauce and cheese, popped them back in for three minutes, and served them. My friend Mike took one bite, looked at me, and said, “Did you fry these? They’re so crispy.” When I told him it was the air fryer, he didn’t believe me until I showed him the appliance. That was the moment I realized this wasn’t just a hack; it was a legitimate upgrade.
Since then, this has become my go-to when I want something impressive but don’t want to spend two hours in the kitchen. It’s forgiving, it’s fast, and it tastes like you spent all day slaving over a stove. Plus, the cleanup is a breeze. If you’re looking for easy weeknight dinners that don’t taste like compromise, this is it.
Ingredients: The Building Blocks of Perfect Chicken Parm
Great food starts with great ingredients. You can’t hide poor-quality chicken under a layer of cheese. Here’s what you need, why it matters, and what you can swap if you’re in a pinch.
The Chicken
- 2 large boneless, skinless chicken breasts (approx. 1.5 lbs / 680g)
- Why: Breast meat is lean and provides a neutral canvas for the flavors.
- Pro Tip: Look for breasts that are relatively uniform in size. If one is huge and the other is tiny, the small one will dry out before the big one is cooked.
- Substitution: You can use chicken thighs for a juicier, richer result, but they won’t have the same classic “cutlet” shape. If using thighs, reduce cooking time slightly as they often cook faster due to higher fat content.
The Breading Station
This is where the magic happens. We’re going for a three-step process: flour, egg, breadcrumbs.
- All-Purpose Flour (½ cup / 60g)
- Role: Helps the egg wash stick to the chicken.
- Substitution: For a gluten-free air fryer chicken parmesan, use almond flour or a 1:1 gluten-free all-purpose blend. Almond flour adds a nice nutty flavor but browns faster, so keep an eye on it.
- Eggs (2 large, beaten)
- Role: The glue that holds the breadcrumbs to the flour.
- Tip: Beat them well with a fork until no streaks remain. Add a splash of water or milk (1 tbsp) to make the wash slightly thinner, which helps it coat evenly without clumping.
- Panko Breadcrumbs (1 cup / 100g)
- Why Panko? This is non-negotiable for the best crunch. Panko flakes are larger and airier than traditional fine breadcrumbs. They create a shattery, light crust rather than a dense, hard shell. Regular breadcrumbs can work, but they tend to get soggy under the sauce.
- Substitution: If you only have regular breadcrumbs, mix them with a little crushed cornflake cereal for extra texture.
- Grated Parmesan Cheese (½ cup / 50g)
- Role: Mixed into the breadcrumbs, this adds savory depth (umami) and helps the coating brown beautifully.
- Brand Note: Use the stuff in the green can if you must, but freshly grated Parmigiano-Reggiano or Pecorino Romano will elevate the dish significantly. The oils in real cheese help with browning.
- Seasonings for the Breading
- 1 tsp Garlic Powder
- 1 tsp Dried Oregano
- ½ tsp Salt
- ¼ tsp Black Pepper
- Why: Seasoning the breading ensures every bite is flavorful, not just the surface. Don’t skip this!
The Toppings
- Marinara Sauce (1 cup / 240ml)
- Choice: You can use store-bought (look for brands with simple ingredients like San Marzano tomatoes, basil, and olive oil) or homemade.
- Tip: Warm the sauce slightly before topping the chicken. Cold sauce on hot chicken lowers the temperature and can make the breading soggy.
- Substitution: Any robust tomato sauce works. Arrabbiata for spice, or a creamy vodka sauce if you’re feeling decadent (though that changes the profile significantly).
- Mozzarella Cheese (1 cup shredded, approx. 4 oz / 115g)
- Type: Low-moisture, whole-milk mozzarella is best. Fresh mozzarella balls contain too much water and will release liquid, making your dish soupy.
- Shredding: Buy a block and shred it yourself. Pre-shredded cheese contains anti-caking agents (like cellulose) that prevent it from melting smoothly. It might look convenient, but it doesn’t melt as nicely.
- Provolone Cheese (2 slices or ½ cup shredded, approx. 2 oz / 55g)
- Secret Weapon: Provolone adds a sharp, tangy kick that cuts through the richness of the mozzarella. It’s the difference between “good” and “wow.” If you can’t find it, extra mozzarella works, but you’ll miss that depth.
- Fresh Basil (for garnish)
- Adds freshness and color at the end.
Cooking Fat
- Olive Oil Spray or Avocado Oil Spray
- You need to lightly coat the breaded chicken to help it brown. An oil spray is the most efficient way to do this without drenching the breading. Avoid non-stick sprays with lecithin if possible, as they can leave a sticky residue on your air fryer basket over time. Pure oil in a mister bottle is ideal.
What to Serve With: Completing the Meal
Chicken Parmesan is a hearty main course, so you want sides that balance the richness and acidity. You don’t want anything too heavy, or you’ll be in a food coma by 7 PM. Here are seven pairing ideas that work beautifully, along with a beverage suggestion to tie it all together.
1. Classic Spaghetti Aglio e Olio
Keep the pasta simple. Since the chicken is sauced and cheesy, a light pasta with garlic, olive oil, red pepper flakes, and parsley provides a nice textural contrast without competing for attention. It’s light, oily, and garlicky—perfect for soaking up any extra marinara on the plate.
2. Arugula Salad with Lemon Vinaigrette
The peppery bite of arugula cuts through the heaviness of the fried chicken and cheese. A simple dressing of lemon juice, olive oil, salt, and pepper adds acidity that cleanses the palate between bites. Throw in some shaved parmesan on top to link it back to the main dish.
3. Roasted Broccolini with Garlic and Chili
Green vegetables are essential here. Broccolini is sweeter and more tender than regular broccoli. Roast it until the tips are charred, toss with minced garlic and a pinch of chili flakes. The slight bitterness and char provide a nice counterpoint to the sweet marinara.
4. Garlic Bread (Obviously)
Is it redundant to have bread with breaded chicken? Maybe. Is it delicious? Absolutely. Use a crusty baguette, slather with garlic butter, and toast it until crisp. It’s the ultimate vehicle for mopping up sauce. If you’re watching carbs, skip this, but for a true Italian-American experience, it’s mandatory.
5. Caprese Salad
Sliced tomatoes, fresh mozzarella, and basil drizzled with balsamic glaze. It’s fresh, cool, and acidic. The raw tomatoes provide a juicy contrast to the cooked, saucy chicken. It’s also visually stunning on the table, adding bright reds and whites to the spread.
6. Sautéed Spinach with Pine Nuts
Quick, easy, and nutritious. Sauté fresh spinach in olive oil until wilted, toss with toasted pine nuts and a squeeze of lemon. It’s light enough that it won’t weigh you down, but the nuts add a nice crunch that mirrors the breading.
7. Antipasto Platter
If you’re serving guests, put out a small platter of marinated artichoke hearts, olives, and roasted red peppers. These pickled and marinated items offer bright, vinegary notes that cut through the fat of the cheese and chicken.
Beverage Pairing: Chianti Classico
You need a wine with enough acidity to match the tomato sauce and enough tannins to handle the protein. A Chianti Classico from Tuscany is the classic pairing. It’s medium-bodied, with notes of cherry, plum, and earthy herbs. The acidity lifts the richness of the cheese, while the fruit complements the sweetness of the marinara.
Non-Alcoholic Option: Sparkling water with a splash of blood orange juice and a sprig of rosemary. The bubbles cleanse the palate, and the citrus mirrors the acidity in the tomato sauce.
Step-by-Step Cooking Process
Alright, let’s get into the nitty-gritty. I’ve broken this down into clear, manageable steps. Follow these, and you’ll have a perfect air fryer chicken parmesan every single time.
Prep Time: 15 Minutes | Cook Time: 15 Minutes | Total Time: 30 Minutes
Step 1: Prepare the Chicken Cutlets
The biggest mistake people make with chicken breasts is cooking them unevenly. One side is thick, the other is thin. The thin side dries out; the thick side remains raw. We need to fix that.
- Using a meat mallet (or a heavy rolling pin or even a cast-iron skillet), pound the chicken to an even thickness. You’re aiming for about ½ inch (1.25 cm) thick.
- Don’t be shy. Pound it firmly. You want uniformity. If a breast is huge, you can slice it horizontally into two thinner cutlets before pounding.
- Pat the chicken dry with paper towels. Moisture is the enemy of crispiness. If the chicken is wet, the breading will slide off.
Step 2: Set Up the Breading Station
Organization is key here. You want an assembly line: Flour -> Egg -> Breadcrumbs.
- Get three shallow bowls or plates.
- Bowl 1: Add the ½ cup all-purpose flour. Mix in a pinch of salt and pepper.
- Bowl 2: Crack the two eggs and beat them thoroughly with a fork until uniform yellow.
- Bowl 3: Combine the 1 cup panko breadcrumbs, ½ cup grated parmesan, 1 tsp garlic powder, 1 tsp dried oregano, ½ tsp salt, and ¼ tsp black pepper. Mix well with your fingers to distribute the herbs and cheese evenly.
Step 3: Bread the Chicken
Now, the fun part. Keep one hand “wet” (for egg) and one hand “dry” (for flour and breadcrumbs) to avoid clumpy fingers.
- Dredge a chicken cutlet in the flour. Shake off any excess. You want a light dusting, not a thick coat.
- Dip the floured chicken into the egg wash. Let the excess drip off for a second.
- Press the chicken firmly into the breadcrumb mixture. Flip it over and press again. Make sure the edges are coated. The pressing action is crucial—it helps the breading adhere during cooking.
- Place the breaded cutlet on a clean plate or wire rack. Repeat with the remaining chicken.
- Resting Tip: Let the breaded chicken sit for 5–10 minutes before cooking. This allows the breading to set and adhere better, reducing the chance of it falling off in the air fryer.
Step 4: Air Fry the Chicken
Preheat your air fryer. Yes, preheating matters. It ensures the chicken hits hot air immediately, starting the crisping process right away.
- Preheat your air fryer to 375°F (190°C) for 3–5 minutes.
- Lightly spray the air fryer basket with olive oil or avocado oil.
- Place the breaded chicken cutlets in the basket in a single layer. Do not overcrowd. If your air fryer is small, cook in batches. Overcrowding leads to steaming, not frying, and you’ll lose that crunch.
- Spray the tops of the chicken cutlets generously with oil. This helps them turn golden brown.
- Cook for 10–12 minutes. Flip the chicken halfway through (around the 6-minute mark) and spray the other side lightly if it looks dry.
- The chicken is done when the internal temperature reaches 165°F (74°C) and the exterior is golden brown and crispy.
Step 5: Add Sauce and Cheese
This is the final stretch. We’re going to top the chicken and melt the cheese.
- Once the chicken is cooked and crispy, remove the basket from the air fryer.
- Spoon about 2–3 tablespoons of warm marinara sauce onto the center of each cutlet. Don’t overload it! Too much sauce will soak into the breading and make it soggy. Leave a border of crispy breading around the edges.
- Top the sauce with a generous handful of shredded mozzarella and a slice (or sprinkle) of provolone cheese.
- Return the basket to the air fryer.
- Cook for an additional 2–3 minutes at 375°F (190°C), or until the cheese is fully melted, bubbly, and slightly spotted with brown. Keep an eye on it—cheese burns quickly!
Step 6: Rest and Serve
Let the chicken rest for 2–3 minutes after taking it out of the air fryer. This allows the cheese to set slightly so it doesn’t slide off when you cut into it, and it lets the juices redistribute in the chicken.
Garnish with fresh basil leaves. Serve immediately with your chosen sides.
Pro Techniques & Troubleshooting: Avoiding Common Mistakes
Even with an air fryer, things can go wrong. Here’s how to avoid the pitfalls.
Problem: The Breading Falls Off
- Cause: The chicken was too wet, or you didn’t press the breadcrumbs firmly enough.
- Fix: Always pat the chicken dry before breading. Press the breadcrumbs into the chicken with your palm. Let the breaded chicken rest for 10 minutes before cooking to let the layers bond.
Problem: The Bottom is Soggy
- Cause: Too much sauce, or the chicken sat in the sauce too long before serving.
- Fix: Apply sauce just before the final melting step. Don’t drown the chicken; use a light hand. Serve immediately after cooking. If you’re meal-prepping, store the sauce and chicken separately and assemble before reheating.
Problem: The Cheese Burns Before the Chicken is Done
- Cause: Air fryers vary in power. Some run hot.
- Fix: Check the chicken’s internal temperature before adding cheese. If the chicken is done but not browned, you can broil it in a regular oven for 1–2 minutes, but usually, the air fryer handles both. If the cheese is browning too fast, lower the temperature to 350°F (175°C) for the melting stage.
Problem: Dry Chicken
- Cause: Overcooking. Chicken breasts are lean and dry out quickly.
- Fix: Use a meat thermometer. Pull the chicken out when it hits 160°F (71°C); it will carry over cook to 165°F (74°C) while resting. Pounding the chicken to an even thickness ensures it cooks uniformly.
Dietary Adjustments: Making It Work for Everyone
One of the best things about this recipe is its flexibility. Here’s how to adapt it for different dietary needs.
Gluten-Free Air Fryer Chicken Parmesan
- Swap: Replace all-purpose flour with almond flour or rice flour. Replace panko breadcrumbs with gluten-free panko (available in most major grocery stores now) or crushed gluten-free crackers/cornflakes.
- Note: Gluten-free breadcrumbs can brown faster, so reduce cooking time by 1–2 minutes and check frequently.
Dairy-Free Option
- Swap: Use dairy-free mozzarella shreds (brands like Miyoko’s or Violife melt reasonably well). Skip the parmesan in the breading or use a nutritional yeast blend for that savory, cheesy flavor.
- Note: Dairy-free cheese doesn’t brown the same way as real cheese. It might look pale, but it will still melt. You can add a sprinkle of nutritional yeast on top for color.
Keto/Low-Carb
- Swap: Replace flour with almond flour. Replace panko breadcrumbs with crushed pork rinds or a mix of almond flour and grated parmesan.
- Note: Pork rind crumbs create an incredibly crispy, low-carb crust. It’s surprisingly delicious and adds a savory punch. Ensure your marinara sauce is low-sugar (many store brands have added sugar; look for ones with <5g sugar per serving).
Storage and Reheating: Leftovers Done Right
Chicken Parmesan leftovers are actually fantastic—if you reheat them correctly.
- Storage: Store leftover chicken in an airtight container in the refrigerator for up to 3 days. If possible, store the sauce and cheese-topped chicken separately from any plain breaded chicken to maintain texture.
- Reheating: Do NOT microwave. Microwaving will turn the breading rubbery and soggy.
- Air Fryer Method: Preheat to 350°F (175°C). Place leftovers in the basket and heat for 3–5 minutes until warmed through and crispy. This restores the crunch beautifully.
- Oven Method: Preheat to 375°F (190°C). Place chicken on a wire rack over a baking sheet. Heat for 10–15 minutes.
Final Thoughts: Why This Recipe Works
This air fryer chicken parmesan recipe is more than just a quick dinner idea. It’s a testament to how modern appliances can enhance traditional cooking methods without sacrificing soul. You get the crunch, the melt, the tang, and the comfort, all with less oil, less mess, and less time.
I encourage you to try it this week. Invite some friends over, pour a glass of Chianti, and watch their faces when you tell them it came from the air fryer. It’s a small victory in the kitchen, but sometimes, those are the best ones.
Happy cooking!